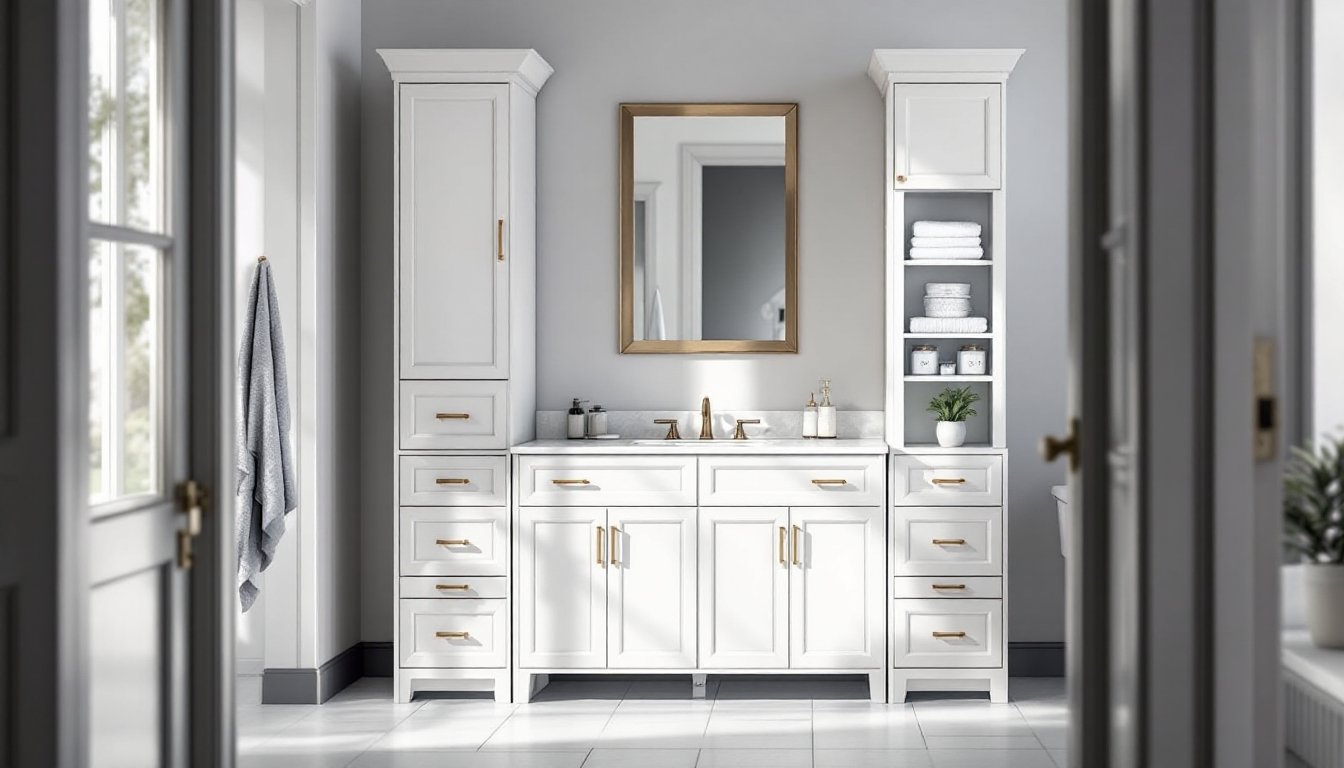
A cramped bathroom doesn’t have to stay that way. Combining a vanity with an integrated storage tower transforms how you use every inch of floor space while keeping daily essentials within arm’s reach. Unlike traditional separate pieces, a vanity-tower combo consolidates function, sink, counter space, and storage, into one compact footprint. This hybrid approach appeals to homeowners juggling small master baths, guest bathrooms, or anyone looking to maximize storage without a renovation budget that breaks the bank. Whether you’re planning a full bathroom refresh or targeting a quick upgrade, understanding your options for vanity-tower combinations helps you pick the right fit for your space and style.
Table of Contents
ToggleKey Takeaways
- A bathroom vanity with storage tower consolidates sink, counter space, and vertical storage into one compact footprint, freeing up wall space and maximizing function in small bathrooms.
- Choose materials wisely—plywood and solid wood with quality polyurethane finishes resist moisture best, while MDF is affordable but risks swelling if water penetrates the protective seal.
- Measure twice and account for wall studs, plumbing clearance, door swing, and floor space before selecting your vanity-tower placement to avoid costly mistakes.
- Modern minimalist designs emphasize clean lines and floating vanities for spacious feels, while transitional styles blend classical proportions with modern efficiency for versatile appeal.
- Proper installation requires mounting vanities weighing over 50 pounds to wall studs with 2.5-inch cabinet screws, and adding a moisture barrier behind the cabinet prevents long-term water damage.
- Soft-close hinges and stainless steel hardware cost more upfront but reduce wear and noise over years of daily use in humid bathroom environments.
Why Combine Your Vanity and Storage Tower
A bathroom vanity with storage tower solves a universal problem: every square foot counts. Instead of installing separate pieces, a vanity here, a tall cabinet there, you get vertical storage that sits right beside or above your sink area. This consolidation frees up wall space and eliminates awkward gaps that collect dust and clutter.
Practically speaking, a tower stores hair products, medications, towels, and cleaning supplies in one organized location. You’re not hunting through three different cabinets to find what you need. The vertical design also keeps items off the counter, which is essential in smaller bathrooms where counter space is already precious.
For DIYers, a pre-made vanity-tower unit saves assembly time compared to sourcing and building separate pieces. If you’re planning to build from scratch, a tower next to your vanity is structurally simpler than installing separate wall cabinets and requires fewer fastening points. The finished look feels intentional and designer-like, even if you chose an affordable off-the-shelf option.
Design Styles and Configuration Options
Your vanity-tower combo should reflect your bathroom’s overall aesthetic while staying functional. Styles range from sleek and contemporary to warm and traditional, with plenty of middle ground for transitional homes.
Modern Minimalist Designs
Modern vanities with tower units emphasize clean lines, flat-panel doors, and often feature open shelving or glass-front drawers. Materials like matte white, gray, or natural wood without heavy detailing define this category. Some models include integrated lighting under the countertop or within the tower, creating a spa-like feel without extra installation. A floating vanity paired with a sleek tower maximizes the visual opening below, making tight bathrooms feel more spacious.
Traditional and Transitional Styles
Traditional designs incorporate raised-panel cabinetry, turned legs, and ornamental hardware, think oil-rubbed bronze or brushed brass pulls. Transitional pieces blend the best of both worlds: the comfort of classical proportions with modern efficiency. Beadboard backing, wainscoting details, or subtle crown molding often appear in these ranges. A transitional vanity-tower in soft gray or creamy white works with nearly any existing bathroom tile or fixtures, making it a safe choice if you’re unsure about your long-term design direction.
For inspiration and to see how different styles work in real spaces, browsing home decorating ideas on Homify can spark your direction. You’ll see dozens of bathroom layouts showing how towers pair with various vanities in actual homes, not just isolated product photos.
Choosing the Right Size and Layout for Your Space
Measure twice, buy once. Start by measuring your available wall space and accounting for clearance. A standard vanity is 30 to 48 inches wide: most towers are 12 to 20 inches wide and 60 to 84 inches tall. The tower typically sits adjacent to or above the vanity.
Consider plumbing and electrical rough-ins. If the tower sits beside the vanity, it shouldn’t obstruct under-sink plumbing or water lines. If you’re mounting it above, ensure no pipes run directly behind the wall space. Talk to a plumber or electrician before committing to placement, a $50 consultation beats tearing out a new cabinet later.
Floor space matters too. In a galley-style bathroom, a tower beside the vanity might block foot traffic. Corner or over-toilet towers might be smarter. Measure the floor footprint and simulate the layout with painter’s tape on the floor to confirm sightlines and movement.
Door swing is often overlooked. If your bathroom door swings inward, a tall tower positioned on that side can create a cramped entry. Keep at least 30 inches of clearance in front of the vanity for comfortable use. A pedestal or wall-mounted tower shifts storage vertically without eating floor space.
Material Selection and Durability Considerations
Bathroom cabinets live in a humid, splash-prone environment. Material choice directly impacts how long your vanity-tower combo lasts without warping, peeling, or rotting.
Plywood and solid wood with quality finishes are the gold standard. Plywood resists moisture better than particleboard and supports weight without sagging. Expect to spend more, but the longevity justifies it. Painted finishes (typically polyurethane or lacquer) seal wood from moisture: stain alone isn’t adequate in bathrooms.
MDF (medium-density fiberboard) is common in mid-range vanities because it’s affordable and machines well. But, MDF swells and delaminates if water penetrates the finish. It works fine if fasteners stay tight and you maintain the paint seal, but it’s riskier in high-humidity bathrooms or near running water.
Thermofoil or laminate veneer wraps wood or MDF, adding water resistance. These finishes hide imperfections and resist staining, making them practical for busy households. They’re harder to refinish than solid wood if you want to change the look later.
Hardware matters too. Stainless steel or powder-coated metal pulls resist rust better than bare steel. Soft-close hinges and drawer slides cost more upfront but reduce wear and noise, worthwhile if the vanity will take years of daily use.
For DIYers considering a custom build, Ana-White’s free woodworking plans for storage towers offer tested designs using standard lumber and materials you can source locally. Building your own lets you control material quality and customize dimensions.
DIY Installation and Setup Tips
Most homeowners can install a pre-made vanity-tower unit with basic tools and a helper. Structural vanities bolted to wall studs carry weight safely: freestanding towers sit on the floor and don’t require fastening.
Pre-installation checklist: Turn off water and electricity if replacing an existing vanity. Remove the old unit and inspect the wall. Fill any screw holes or damage with spackling, sand smooth, and prime. Moisture barrier or waterproof drywall behind the vanity prevents rot if water seeps behind the cabinet, worth adding if you’re removing old cabinetry and exposing bare drywall.
Mounting: Locate wall studs using a stud finder. A vanity weighing more than 50 pounds needs mounting to studs using 2.5-inch cabinet screws through the back rail. Never rely solely on drywall anchors. If studs don’t align with your preferred placement, you can use a horizontal 2×4 blocking installed between studs to create a fastening surface.
Plumbing and drainage: If the tower contains a sink, the P-trap must slope slightly toward the drain (typically 1/4 inch drop per running foot). Pre-drill mounting holes for supply lines and ensure shutoff valves are accessible. If adding a tower without sink plumbing, the task is simpler, just level it and fasten.
Safety: Wear safety glasses when drilling overhead or near your face. Use a dust mask when sanding or disturbing old finishes (especially if lead paint is possible in older homes, test first). Have a helper when moving heavy vanities to avoid back injury and ensure stable placement before fastening.
For bathroom design inspiration and professional installation examples, Remodelista’s kitchen and bathroom guides showcase finished projects with detailed sourcing information. Seeing how professionals install similar pieces helps you anticipate challenges.